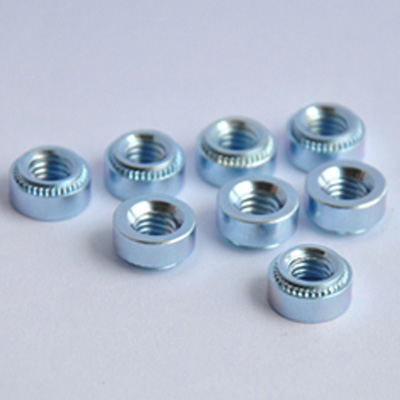
Self-locking clinch nuts are a versatile and efficient solution for providing secure threaded connections in thin materials like sheet metal. Whether you're working in the automotive, aerospace, or electronics industries, Self-clinching fasteners, including Self-clinching Nuts and self-locking clinch nuts, offer an ideal solution where both performance and ease of installation are critical.

Tools and Materials Needed
Before you begin, it's important to gather the right tools and materials to ensure a smooth installation. Here's what you’ll need:
1.Self-locking clinch nuts (or Self-Clinching Nuts)
2.Punch press or manual installation tool
3.Drill and appropriate size drill bit
4.Fixture or clamp to secure the material
5.Torque wrench (optional, for precise torque control)
6.Lubricant (optional, for smoother installation)
Step 1: Prepare the Material
The first step in installing self-locking clinch nuts is preparing the material. Self-clinching fasteners are ideal for use in thin materials such as sheet metal or plastic, where you cannot access the backside.
Drill the Hole:Using the correct size drill bit, drill a hole into the material where you want to install the self-locking clinch nut. The size of the hole is critical; it must match the specifications of the self-clinching nut or self-locking clinch nut you are using. Typically, manufacturers provide detailed instructions for the hole diameter to ensure proper fitment.
Step 2: Position the Self-Locking Clinch Nut
Once the hole is drilled, the next step is to position the self-locking clinch nut in the hole. Here's how to proceed:
Align the Clinch Nut:Take the self-locking clinch nut and align it carefully with the hole. Ensure that the nut’s flange sits evenly with the surface of the material. The flange is essential for the clinching process, so it must be in the correct position to ensure proper locking.
Secure the Material:To avoid movement during installation, secure the material using a fixture or clamp. This will ensure a stable base for the clinch nut as it’s pressed into place.
Step 3: Install the Self-Locking Clinch Nut
The installation of self-locking clinch nuts is typically done using a punch press, but manual installation tools can also be used for smaller projects. Here’s how the installation process works:
Press the Nut into Place:Using a punch press or a manual installation tool, apply force to the self-locking clinch nut, pressing it into the hole. As pressure is applied, the nut’s flange will deform, causing it to lock securely into the material. This process is known as clinching. The nut will be held tightly in place by the deformed edges of the hole, creating a permanent, secure thread.
Monitor the Clinching Process:While applying pressure, keep an eye on the installation to ensure that the nut is seating correctly. The flange should be flush with the material surface, and the clinch should be uniform around the nut for maximum holding power.
Step 4: Ensure Proper Thread Engagement
After installing the self-locking clinch nut, it’s important to ensure that the nut's internal threads are correctly aligned and functional.
Check the Thread:Using a bolt that fits the thread size of the clinch nut, test the thread engagement. The bolt should easily thread in and out without any resistance, indicating the nut’s internal threads are intact and correctly aligned.
Torque Control (Optional):If required, use a torque wrench to ensure that the bolt or fastener inside the self-locking clinch nut is tightened to the correct specification. This will prevent over-tightening or under-tightening, which could compromise the integrity of the connection.
Step 5: Final Inspection
Once the installation is complete, it’s important to perform a final inspection to ensure that the self-locking clinch nut has been installed properly and is secure.
Inspect the Nut:Check that the self-locking clinch nut is flush against the surface, and there are no visible gaps or misalignment. The nut should be firmly locked in place, and its threads should be undamaged.
Ensure Functionality:Finally, check the functionality of the thread connection. Ensure the threaded fastener inserted into the clinch nut holds tight and remains secure, even under vibration or movement.
Benefits of Self-Locking Clinch Nuts
Self-locking clinch nuts offer several advantages over other fastening solutions:
1.No Need for Backside Access:Self-clinching nuts and self-locking clinch nuts eliminate the need for access to the back of the material, making them ideal for thin materials and confined spaces.
2.Vibration Resistance:The self-locking feature prevents the nut from loosening over time, even in environments with constant vibration or dynamic loads.
3.Ease of Installation:These fasteners are quick and easy to install, reducing assembly time and labor costs.
4.Cost-Effective:By eliminating the need for additional fasteners or tools, self-locking clinch nuts provide a cost-effective solution for securing threaded connections.
Installing self-locking clinch nuts is a straightforward process that can be done efficiently with the right tools and techniques. These fasteners provide a reliable and secure threaded connection, especially in thin materials where traditional nuts or bolts might not be suitable. By following this step-by-step guide, you can ensure a secure, vibration-resistant connection in a variety of applications, from automotive manufacturing to electronics and more. Whether you’re using self-clinching nuts or self-locking clinch nuts, you can rely on these fasteners to deliver long-lasting performance with ease.